
Creating an account and website
To get started, you’ll need an account and website. You can get both by filling out our request a site form.
1-2 business days after submitting the request form, you’ll receive an email that lets you set a password for your GC Articles account.
Logging in
Use your email and password to access your website through the login page.
If you forget your password, you can select “Lost your password”. We’ll send you an email to reset it.
If you have trouble signing in, you can reach out to the support team using our contact us form.
Editing your site
Your new GC Articles site starts in maintenance mode by default. This means your site isn’t live. You can switch maintenance mode on or off in the settings panel. Turning it off will make your website available for the public to see. You can switch it back on at any point.

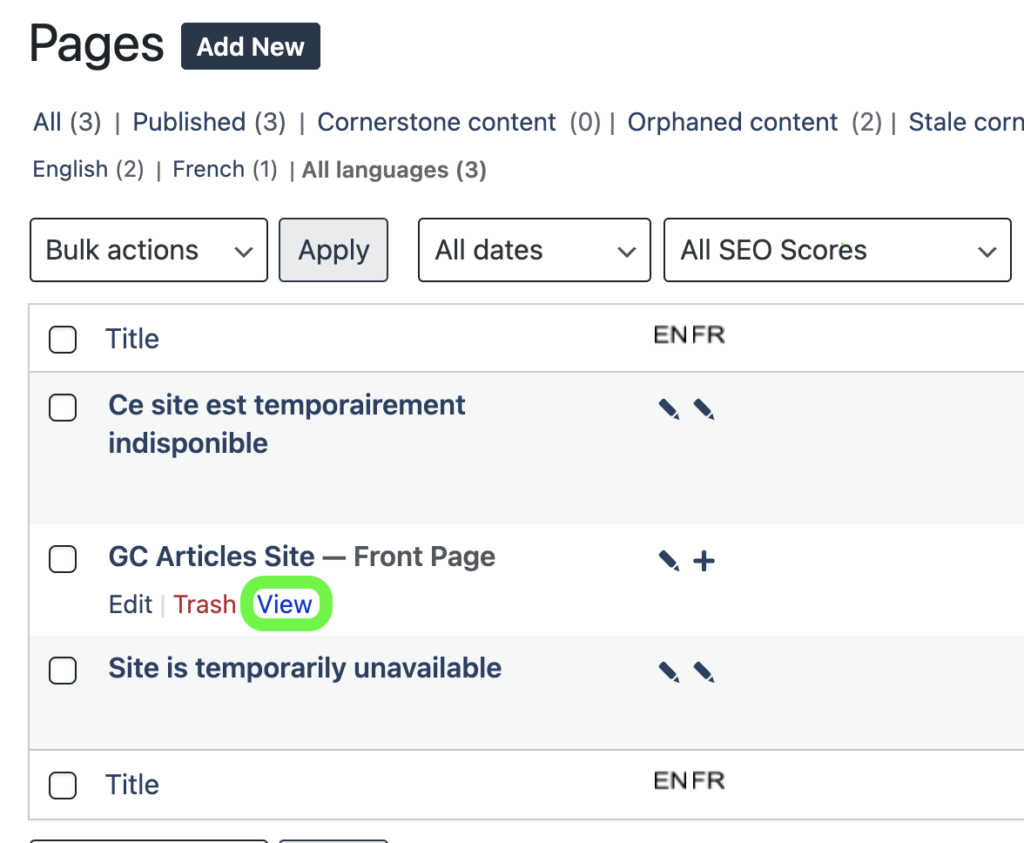
We start you off with a homepage template based on the information you provided in the form. You can view your homepage at any time by selecting ‘View’ from the Pages section of the admin panel. You can also start editing your page from the same panel.
Giving colleagues access to your website
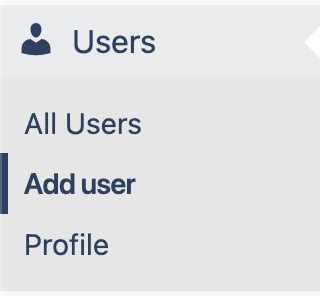
To invite others to collaborate with you, go to the “Users” section in the admin panel and select “Add user”. You will be able to invite anyone with a Government of Canada email to work on your website. You can also select their level of access: writer, editor, or full admin.
Adding content
You can view or add pages and articles from the side admin panel.
Select the page you want to edit from your dashboard. You can add content blocks using the “+” button.
Drag and drop the content block where you’d like it on the page. Once it’s on your page, you can edit the content by clicking on it.
You can save your progress by selecting “Save draft” in the top right corner.
When you’re ready to publish, select the “Publish” button. You can learn more about publishing content here.
Embedding content
If there are things you’d like to add that are not in the pre-loaded library of content blocks, you may be able to embed them onto the page. Some common things to embed include:
- Google Slides
- Google Forms
- Microsoft Power BI dashboard
How to embed content:
- Select the HTML content block
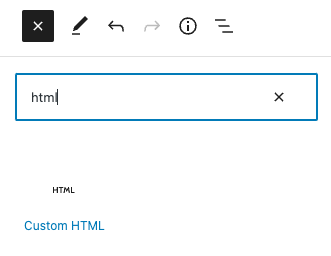
- Enter in the code below, replacing “Yoursitehere” with the url to the content you’d like to embed.
<iframe src="Yoursitehere" frameborder="0" width="960" height="600" allowfullscreen="true" mozallowfullscreen="true" webkitallowfullscreen="true"></iframe>Headless CMS – Integrate with an API
The GC Articles REST Application Programming Interface or API is organized around REST and is designed to have predictable, resource-oriented URLs and to use HTTP response codes to indicate API errors. The API uses built-in HTTP features, like HTTP authentication and HTTP verbs, which can be understood by off-the-shelf HTTP clients, and supports cross-origin resource sharing to allow you to interact securely with the API from a client-side web application.
The REST API uses JSON exclusively as the request and response format, including error responses. While the REST API does not completely conform to the HAL standard, it does implement HAL’s ._links and ._embedded properties for linking API resources, and is fully discoverable via hyperlinks in the responses.
This API reference provides information on the specific endpoints available through the API, their parameters, and their response data format.
API Endpoint
GC Articles is based on the open source content management platform WordPress. This allows GC Articles to support all the same API actions as WordPress and follow the same format.
The GC Articles API can be found at https://articles.alpha.canada.ca/wp-json/
The API exposes self-documentation at the index endpoint, or via an OPTIONS request to any endpoint, allowing human- or machine-discovery of endpoint capabilities.
A demo installation of the API for testing purposes is available at https://demo.wp-api.org/wp-json/; this site supports auto-discovery, and provides read-only demo data.
REST API Developer Endpoint Reference
| Resource | Base Route |
|---|---|
| Posts | /wp/v2/posts |
| Post Revisions | /wp/v2/posts/<id>/revisions |
| Categories | /wp/v2/categories |
| Pages | /wp/v2/pages |
| Page Revisions | /wp/v2/pages/<id>/revisions |
| Comments | /wp/v2/comments |
| Taxonomies | /wp/v2/taxonomies |
| Media | /wp/v2/media |
| Users | /wp/v2/users |
| Post Types | /wp/v2/types |
| Post Statuses | /wp/v2/statuses |
| Settings | /wp/v2/settings |
| Themes | /wp/v2/themes |
| Search | /wp/v2/search |
| Block Types | /wp/v2/block-types |
| Blocks | /wp/v2/blocks |
| Block Revisions | /wp/v2/blocks/<id>/autosaves/ |
| Block Renderer | /wp/v2/block-renderer |
| Block Directory Items | /wp/v2/block-directory/search |
| Plugins | /wp/v2/plugins |
Authenticated content management actions
The REST API provides public data accessible to any client anonymously, as well as private data only available after authentication. Once authenticated the REST API supports most content management actions, allowing you to build alternative dashboards for a site, enhance your plugins with more responsive management tools, or build complex single-page applications.